워프 형광펜 밑줄 만들기 목차
워드프레스가 티스토리보다는 확실히 작업하기 어렵습니다. 하지만 코드(code) 고수들이 정리를 해놓은 자료를 잘 따라가 보면 영 못할 것도 아니라는 생각이 드네요. 이번에는 워프 본문에 형광펜 밑줄 넣기입니다. 형광펜으로 강조표시를 하는 것이 뭐 그리 필요할까 싶었는데, 아무래도 광고 때문에 본문 내용이 지저분해지다보니 가독성을 높이기 위해 필요한 것 같습니다.
워프 에디터의 밑줄넣기
이번 작업은 워드프레스 본문에서 밑줄 대신에 형광펜으로 강조표시를 하는 방식입니다. 이 포스팅은 대다수 ‘워드프레스 정보꾸러미’ 포스팅을 따라했습니다. 잘 설명이 돼 있는데, 한번에 이해가 잘 안가는 부분이 많아서 저같은 초급자들이 더 쉽게 접근할 수 있도록 한번 더 풀어서 설명한 것입니다.
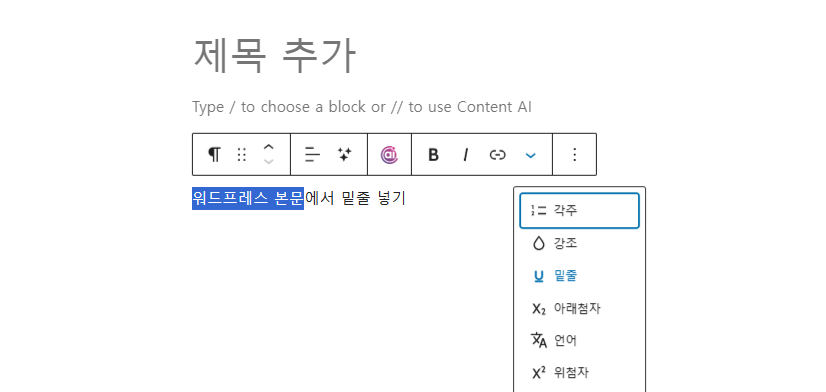
워드프레스 정보꾸러미 바로가기일단, 워프 에디터에서 밑줄을 넣어둡니다. 나중에 넣어도 되지만, 이런 것이 있다는 것은 알고 있어야 하니까요. 워프 본문에서 텍스트에 블럭(쉬프트를 누른 후 우측 커서를 이동시켜 블럭을 만들 수 있음)을 씌운 후 상단 메뉴바에서 아래 화살표시를 눌러주면 밑줄을 넣을 수 있는 버튼이 나옵니다. 이걸 눌러주면 해당 블럭에 밑줄이 표시되죠.
코드 및 파일, CSS 추가하기
워드프레스에서 형광펜 효과를 넣기 위해서는 3가지 단계를 거쳐야 합니다. 하나라도 놓치면 작동하지 않기 때문에 잘 따라오셔야 합니다.
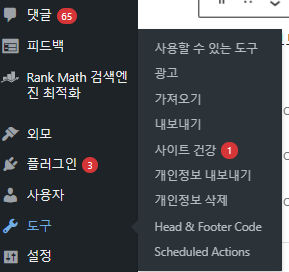
가장 먼저 코드 추가하기입니다. 코드가 뭔지, 어떤 역할을 하는지 몰라도 됩니다. 워드프레스 관리자 페이지에서 도구로 들어가면 Head&Footer Code라는 곳이 있습니다. 이리로 들어가면 간편하게 code 수정이 가능합니다. 이게 없을 수도 있는데요. 그러면 플러그인으로 들어가서 Add New Plugin을 클릭한 후 새로운 Head&Footer Code를 설치해 주면 됩니다.
다시 Head&Footer Code로 들어가면 Head Code, Body Code, Footer Code를 쓰는 곳이 있는데, Footer Code란에 아래의 코드를 적어줍니다.
<script>
document.addEventListener('DOMContentLoaded', function() {
  document.querySelectorAll('.entry-content span').forEach(function(span) {
    if (span.style.textDecoration === 'underline') {
      span.removeAttribute('style'); // Remove the inline style
      span.setAttribute('class', 'custom-highlight'); // Use the class 'custom-highlight'
    }
  });
});
</script>
다음으로 JS파일을 하나올려야 합니다. JS파일 다운로드는 아래에서 하시면 됩니다.
JS파일 다운로드 바로가기일단 다운로드한 파일을 워드패드로 열어줍니다. 이후 아래의 내용을 파일 끄트머리에 삽입을 해줍니다.
// Enqueues the 'custom-highlight.js' script exclusively on single post pages.
// This function first checks if the current page being viewed is a single post using is_single().
// If true, it registers 'custom-highlight.js', located within the child theme's 'js' directory, and sets jQuery as a dependency.
// The script is then enqueued to be loaded in the footer of the page, ensuring it is executed after the page content has loaded.
// This targeted loading approach optimizes site performance by loading the script only where it is needed.

function enqueue_custom_highlight_script() {
    if (is_single()) {
        // Register the script
        wp_register_script('custom-highlight-script', get_stylesheet_directory_uri() . '/child-theme/js/custom-highlight.js', array('jquery'), '', true);

        // Enqueue the script
        wp_enqueue_script('custom-highlight-script');
    }
}
add_action('wp_enqueue_scripts', 'enqueue_custom_highlight_script');
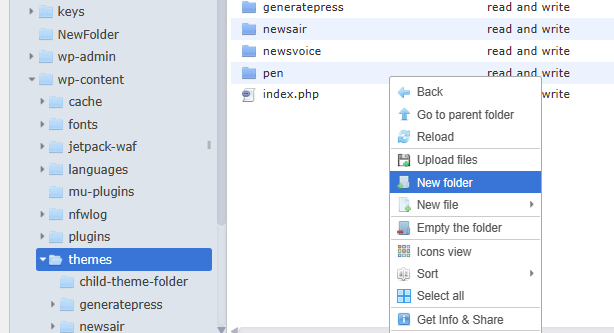
워드프레스 관리자 모드로 들어가서 WP파일관리자에 들어갑니다. /wp-content/themes/child-theme-folder/js/custom-highlight.js 파일을 저장해야 하는데요. 처음 하는 분들은 쉽지 않을 겁니다. 폴더가 없었거든요. WP파일관리자를 누르면 아래와 같이 화면이 뜰겁니다. 좌측에 www를 누르면 우측에 여러 디렉토리(방)가 나오는데요. 거기에서 wp-content를 누릅니다. 그러면 우측 화면에 또 여러 디렉토리가 나옵니다. 거기서 theme를 눌러줍니다. 저 같은 경우에는 child-theme-folder가 없었어요. 우측 화면에 마우스 커서를 올리고 우클릭을 한 후 New folder를 클릭해 줍니다. 거기에 child-theme-folder를 써 주면 디렉토리가 생기게 되죠. 거기에 아까 다운로드한 custom-highlight.js 파일을 드래그해서 가져다 놓으면 됩니다.
이제 거의 끝나갑니다. 다시 워드프레스 관리자 모드로 들어가서 외모>추가css를 클릭해줍니다. 좌측에 css를 넣는 칸이 나오는데요. 거기에 아래 내용을 삽입해줍니다.
/* Applies a gradient background to elements with the 'custom-highlight' class,
   creating a unique highlighting effect. The gradient starts with a solid yellow (#FFEB3B)
   color at the bottom, covering the lower 33% of the element, and transitions to transparent
   at the 25% mark from the bottom. This creates an overlap in the gradient effect,
   which may not render as expected due to the reverse percentages. Adjust the transparent
   percentage to be greater than 33% for a more conventional gradient effect where the color
   smoothly transitions from yellow to transparent upwards. */

.custom-highlight {
  background: linear-gradient(to top, #FFEB3B 33%, transparent 25%);
}
자. 이러면 모든 작업이 끝이 났습니다. 기존에 워드프레스에서 본문에 밑줄을 그어놨던 모든 글에 형광펜으로 색깔이 칠해진 모습을 볼 수 있습니다.
이외에
워드프레스에 대해서 공부를 하면서 중요한 내용들은 따로 정리를 하고 있습니다. 워낙 웹 코드나 html을 다루는 고수분들이 많은데, 저같은 초보자도 이해할 수 있도록 제가 이해한 선에서 최대한 자세히 설명을 하고자 합니다. 고수분들은 설명을 쉽게쉽게 해놔서 저같은 초짜는 봐도 이해하기 어려웠거든요.
보틀브레이커에서 더 알아보기
최신 글을 이메일로 받으려면 구독하세요.